Monthly Archives: July 2013

post by admin | | 0

Important guidelines for cleaning a chandelier

Decorative lighting can add attractiveness to one’s home and it can make your home sophisticated and attractive. Crystal chandeliers come in different types, so you will be having a number of arrays that you can pick from as you look for the ideal one that satisfies your home.

Chandeliers hang up from the ceiling, generally beyond reach for a man. While this fact adds to the mystery and attractiveness of the luxury item, it also makes them amazingly challenging to clean. If Crystal chandeliers are not right managed, these lighting items could simply become lifeless and comfortless with respect to time. On the other hand, if they are dusted and cleaned regularly, you can expect to have your antique light forever look exactly as you got them to your house.chandelier2
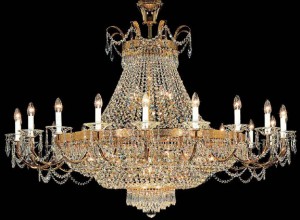
For a quick Crystal chandelier cleaning, you need to start by placing towels into the floor beneath the crystal chandelier. You need to do this to ensure that the home will not get unpleasant just because you’re cleaning a specific part of it. Now, you can use a long-handled feather duster for cleaning the chandeliers. The second step to do is taking a glass cleaner and sprays your crystal chandelier. This is a great and smart way to clean your crystal chandelier.

If you are cleaning your light step-by-step, at first you need to switch off the electricity to the chandelier and let the crystals cool-down just before cleaning. You need to distribute a thick, washable cloth, on the floor under the chandelier, so that you can hold any falling parts. You should not climb on tables to reach the chandelier. You should use a tall ladder so that you won’t have difficulties reaching inner areas of the chandeliers.

You need to take Care if you are removing parts of a crystal chandelier. You need to place tags on each chandelier piece and even on the place on the frame where you take out them. This method will assist you to remember where to put the numerous parts back. Then carefully clean each light bulb with a moist cloth with great care. After doing this you need to cover the bulbs with small plastic bags to stay away from dust from the other parts from dirtying them again.

Just Dust each light bulb and wipe them with a tidy and dry cloth. And avoid from chemical cleaners, as they can damage the chandeliers finish. You can use a cleaning solution of isopropyl alcohol and water for cleaning. You have to use distilled water because it lacks the mineral deposits that create streaks.

There are also some of the methods that you can use for cleaning the chandeliers.  If you are searching for some more options by which you can conveniently clean your chandeliers perfectly, you can take help from the internet or cleaning company.
post by admin | | 0

All about chandelier cleaning

Chandeliers are important highlight items in dining and living spaces of homes. You can make your room amazing by changing a conventional bulb by an outstanding crystal chandelier. An unclean fitting demonstrates a bad image of you. It also reduces the elegance of your living or dining room.
Here is step-by-step info and guideline on how making your chandelier cleaning properly:
At first you need to eliminate the dust on the chandelier one time in a week. If you are doing a frequent dusting you can protect from a huge accumulation of dust in a chandelier as it will be hard to thoroughly clean all of a dust if it has been left a long time. You should bear in mind that before doing any type of cleaning activity, you need to turn off the electrical power to your lighting fixture to stay away from electrocution. Please take some time to let the light bulbs cool-down before you begin cleaning, if you have been using the chandelier. You need to put the bulb of chandelier in some soft towel or cooling down the place so as to clean it properly.

chandelier 1 pic
At the time of Chandelier Cleaning, you should put a thick carpet under it to get any dropping pieces. This will also help avoid falling crystals or glass from destroying your wooden household furniture or floors. You also require to clean the place as well where you are about to hang up the chandelier so that your chandelier will be secured towards the dust for some time. At the time of cleaning you need to eliminate the bulb carefully and then cover it in some plastic-type bags. By doing this you can avoid it from dust and contamination. You need to move anything vulnerable far from the cleaning area.
Always clean chandelier by parts. You can use the bathtub to clean it proficiently and you can clean it with some soap or shampoo to make it more shiny. In chandelier cleaning you need to use the company items so as to manage it’s excelling for long of your chandelier. You should bear in mind that never ever use scrubbers or acid to get rid of its dirt, just use high quality cleaners to get rid of its dirt.
If you are thinking about crystal chandelier cleaning which haven’t been cleaned for a long time, then you should better thoroughly clean it is by separating each of the crystals. You need to do this by using warm water with soap. You should not use so hot water for the reason that this is harmful for the crystals.
If you are separating each part of a chandelier light then you need to deep clean all the parts carefully. You need to clean all the parts and then cover it with the plastic bags. Take away the plastic at the time of rearranging so as to prevent it from getting dusty and keep its shine for more time. So if you are cleaning your light properly then this work of art can bring a tasteful attraction to your home.

post by admin | | 0

Interior design and the introduction of the correct furniture and architectural lighting

When designing a room layout, colour scheme, lighting and furniture all will ultimately be affected by size. The most basic example of this would be that if you have a room that’s a corridor and only two meters wide you can’t put an armchair in, as it will take up the entire hallway whichever way you put it! Whilst a basic and obvious example it does portray the basic rule that if you can’t comfortable walk to an area of your room that will need to be accessed, all you need is meter wide path, then you need to either move some furniture about or get rid of something as you’re most likely unnecessarily filling your room and not allowing the rest of the furniture to be seen and appreciated. Of course the situations changes if the rooms main use if for practical work such as a garage but even then you need to be able to access tools and you will require some good cool white LED panels or LED tubes so you can see clearly should you want to use it as a workshop.
IMG_0216
But there is a lot more to layout than this, but I’m not able to cover it as extensively as I would like, so I recommend you go read another article that’s more specific on that subject, but in all honesty layout really comes down to what suites you and furniture is relatively easy to move so it’s no problem re-adjusting if you don’t like the layout. Wall colouring comes at the other end of this scale, as it not only requires you to move all your furniture away from the walls anyway but it’s simply hard work, and costly to hire on a small scale property. But it needs to be done and it is so much easier to do early on when the other items are not in place, simply due to the nature of the task. The other key aspect on the layout is lighting and this can invariably mean the introduction of architectural LED lighting or if you have a tradition design scheme then a crystal chandelier is often an excellent idea.
I am sure we have all heard of the basic concept that light colours make a room feel larger whilst darker colours make it feel smaller. If you have not, then well now you have. Whilst simple, this is your bread and butter basic size to colour design tip to keep in mind at all times when colouring a room. Another effective technique that ties into this is using dimmable light bulbs to make a room darker or lighter to change how large it feels. Just make sure to be wary of CFL bulbs, as they are prone to having lower quality dimming. Yet filament bulbs work fine, and I find that LED energy saving light bulbs work the best due to the greater variety of different light colours available with them. The additional benefit is that you will be playing your part in improving the environment for future generations.
As a final point, you can also use texture to make a room feel smaller, which can be very effective when you do not want to sacrifice colour scheme yet change how spacious your room feels. When it comes to size and interior design, that’s pretty much all I got on this subject. All there is left to say is good luck!

post by admin | | 0

How to add a Chandelier into your Interior Design Concept

Filling space in a room is often a simply task, simply put in some more furniture! Yet I have seen so many cases where this simply leads to the over crowing of a room and it feels like I am in a storage warehouse, not a living room! The real secret to filling a room well is not by putting more items in it, but by putting the right things in the right place, not simply putting them anywhere!

bournmouth_manor_conversion1_600pxwide

One of my favourite ways to fill space in a living room is actually through the use of mirrors and televisions. This may seem odd, but hear me through. Whilst most wall items, such as wardrobes or pictures, simply develop the space directly in front of them, both TV’s and mirrors have a wide arch of space which they give purpose to, and one or the other fit into almost any domestic home design. As a plus a TV has a purpose, obviously, and can add colour and atmosphere to a room of your choice by simply putting on a DVD and putting the sound on low, effectively acting as a moving picture with sound. And for the mirror, it not only fills space but due to the fact that it reflects the room it is in the area can feel larger on top of more effectively used!
As for the space right in from of the TV or mirror I always feel that a rug can add character to the space and further develop it, via the use of vibrant colours and a rich patter it actually brings itself up from the floor making the space you have just given purpose to feel even more filled. This can also work well in front of large windows and as a centre for a semicircle of chairs and sofas we all so love to have in our living rooms, but you should definitely have a coffee table on it as well so you have somewhere to put drinks, magazines and anything that guests, family and anyone would want to have whilst in the living room; so be prepared for getting food on the rug once in a whilst as nobody is accident prone! For the very reason and the way that furniture dents a rug whilst resting on it I often opt for a less expensive rug in these situations to try to not cut into my coffers too much!
My final tip for using the space in your room would have to be to try to fill the upper room space as much as possible. Imagine one of those huge ball rooms with a glistening crystal chandelier in the centre, but then without the large chandelier. It would be a lot more empty, wouldn’t it! But although beautiful, not everyone can afford a chandelier and many simply do not like them, so I would recommend trying the use of floor lamps, bookcases and general taller furniture to try to fill the ceiling area. Yet in the end I do find the best way to do this is to go for a chandelier, crystal or ornate. But it really comes down to personal preference which I suppose is my true final suggestion. Go for what you like the best!